Starlight Ceiling: How to Get the Rolls-Royce Experience in Your Home
There's a reason Rolls-Royce charges $20,000 for their iconic Starlight Headliner. When you slide into a Phantom or Cullinan and look up at 1,600 hand-placed fiber optic stars twinkling above you, something magical happens. The ordinary disappears. You're transported somewhere extraordinary — gazing at a private cosmos crafted just for you.
Now imagine that same experience in your home theater. Your bedroom. Your children's room. Your spa. That's what a starlight ceiling delivers — the unmistakable feeling of luxury that Rolls-Royce pioneered, installed permanently in your home.
This guide covers everything you need to know about starlight ceilings: how they work, what they cost, DIY vs. professional installation, and why homeowners across Dallas-Fort Worth and Las Vegas are transforming their spaces with fiber optic night skies. Whether you want a simple twinkling effect or a custom constellation mapped to your birthday, we'll show you how to make it happen.
Quick Answer
A starlight ceiling uses fiber optic strands to create a realistic twinkling night sky effect on any ceiling. The fibers carry only light (no electricity), making them safe for any room including bathrooms, pools, and children's spaces. Professional turnkey installations run $75-79 per square foot (product + installation), with most residential projects ranging from $7,500 to $32,000 depending on room size.
Key Benefits:
- Creates the iconic Rolls-Royce Starlight Headliner experience at home
- 100% safe — fiber optics carry light only, no electricity or heat
- Perfect for home theaters, bedrooms, kids' rooms, spas, and commercial spaces
- Options from DIY kits to full professional installation
- Effects include twinkling, shooting stars, color-changing, and custom constellations
What Is a Starlight Ceiling?
A starlight ceiling recreates the night sky indoors using hundreds or thousands of tiny fiber optic strands. Each strand carries light from a central illuminator (called a "light engine") to a point on your ceiling, where it appears as a glowing star. Advanced systems add twinkling effects, shooting stars, and even color-changing sequences to create a dynamic, living sky above you.
The technology is elegantly simple: a single light source in a hidden location (typically above the ceiling or in an adjacent room) powers every "star" through thin, flexible fiber optic cables. Because the fibers carry only photons — not electrical current — there's no heat, no electrical hazard, and no risk of fire. You could touch a lit fiber strand and feel nothing but cool plastic.
The Rolls-Royce Connection
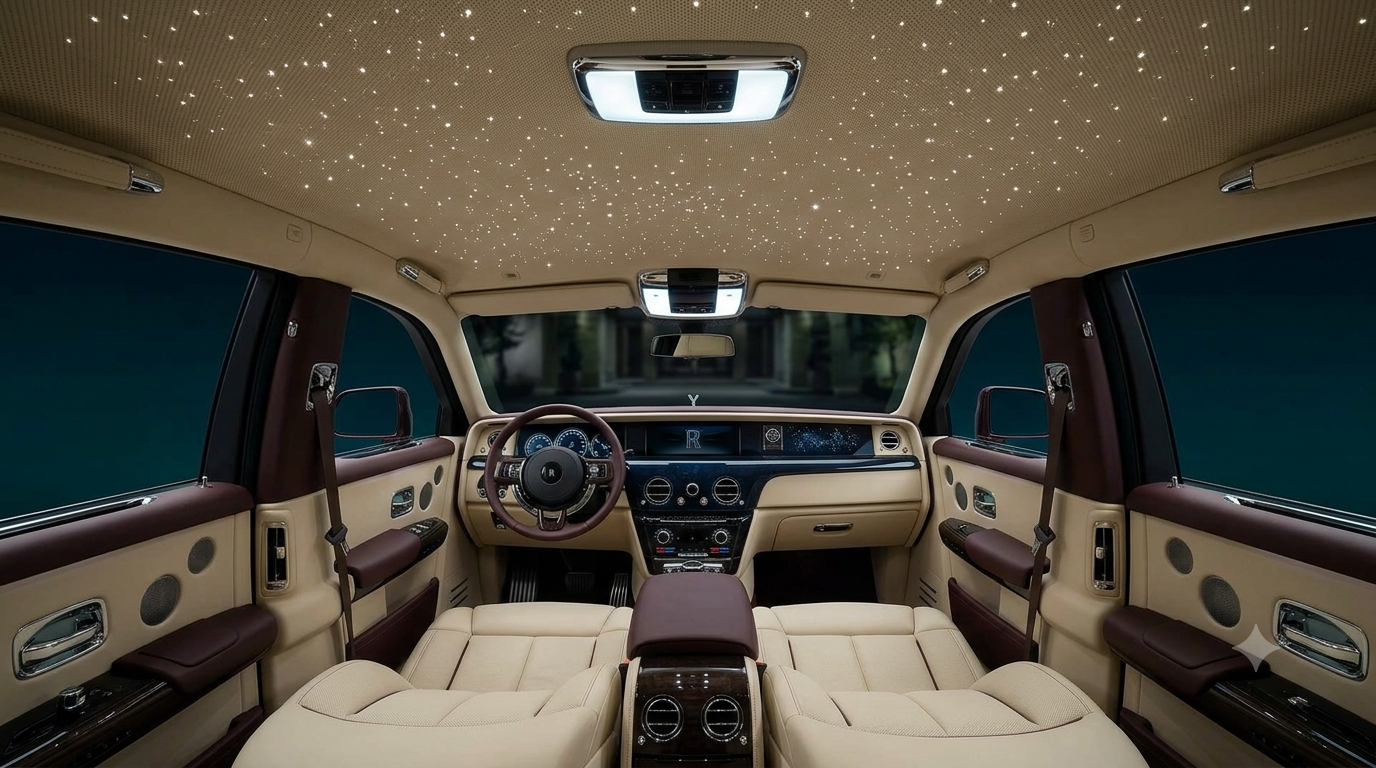
Rolls-Royce popularized the starlight ceiling concept with their legendary Starlight Headliner, first introduced in the Phantom. Each headliner takes 9-17 hours to craft by hand, with artisans placing up to 1,600 fiber optic strands at varying depths and angles to create realistic twinkling effects. The option costs approximately $20,000 — and it's become one of the most requested Rolls-Royce features worldwide.
What makes the Rolls-Royce version special isn't just the star count — it's the attention to detail. Stars twinkle at different rates. Some burn bright while others glow softly. The pattern appears random, just like a real night sky. This is the standard we aim to match with professional starlight ceiling installations.
Where Can You Install a Starlight Ceiling?
One of the best things about fiber optic starlight ceilings is their versatility. Because the fibers carry no electricity and generate no heat, they can safely go almost anywhere.
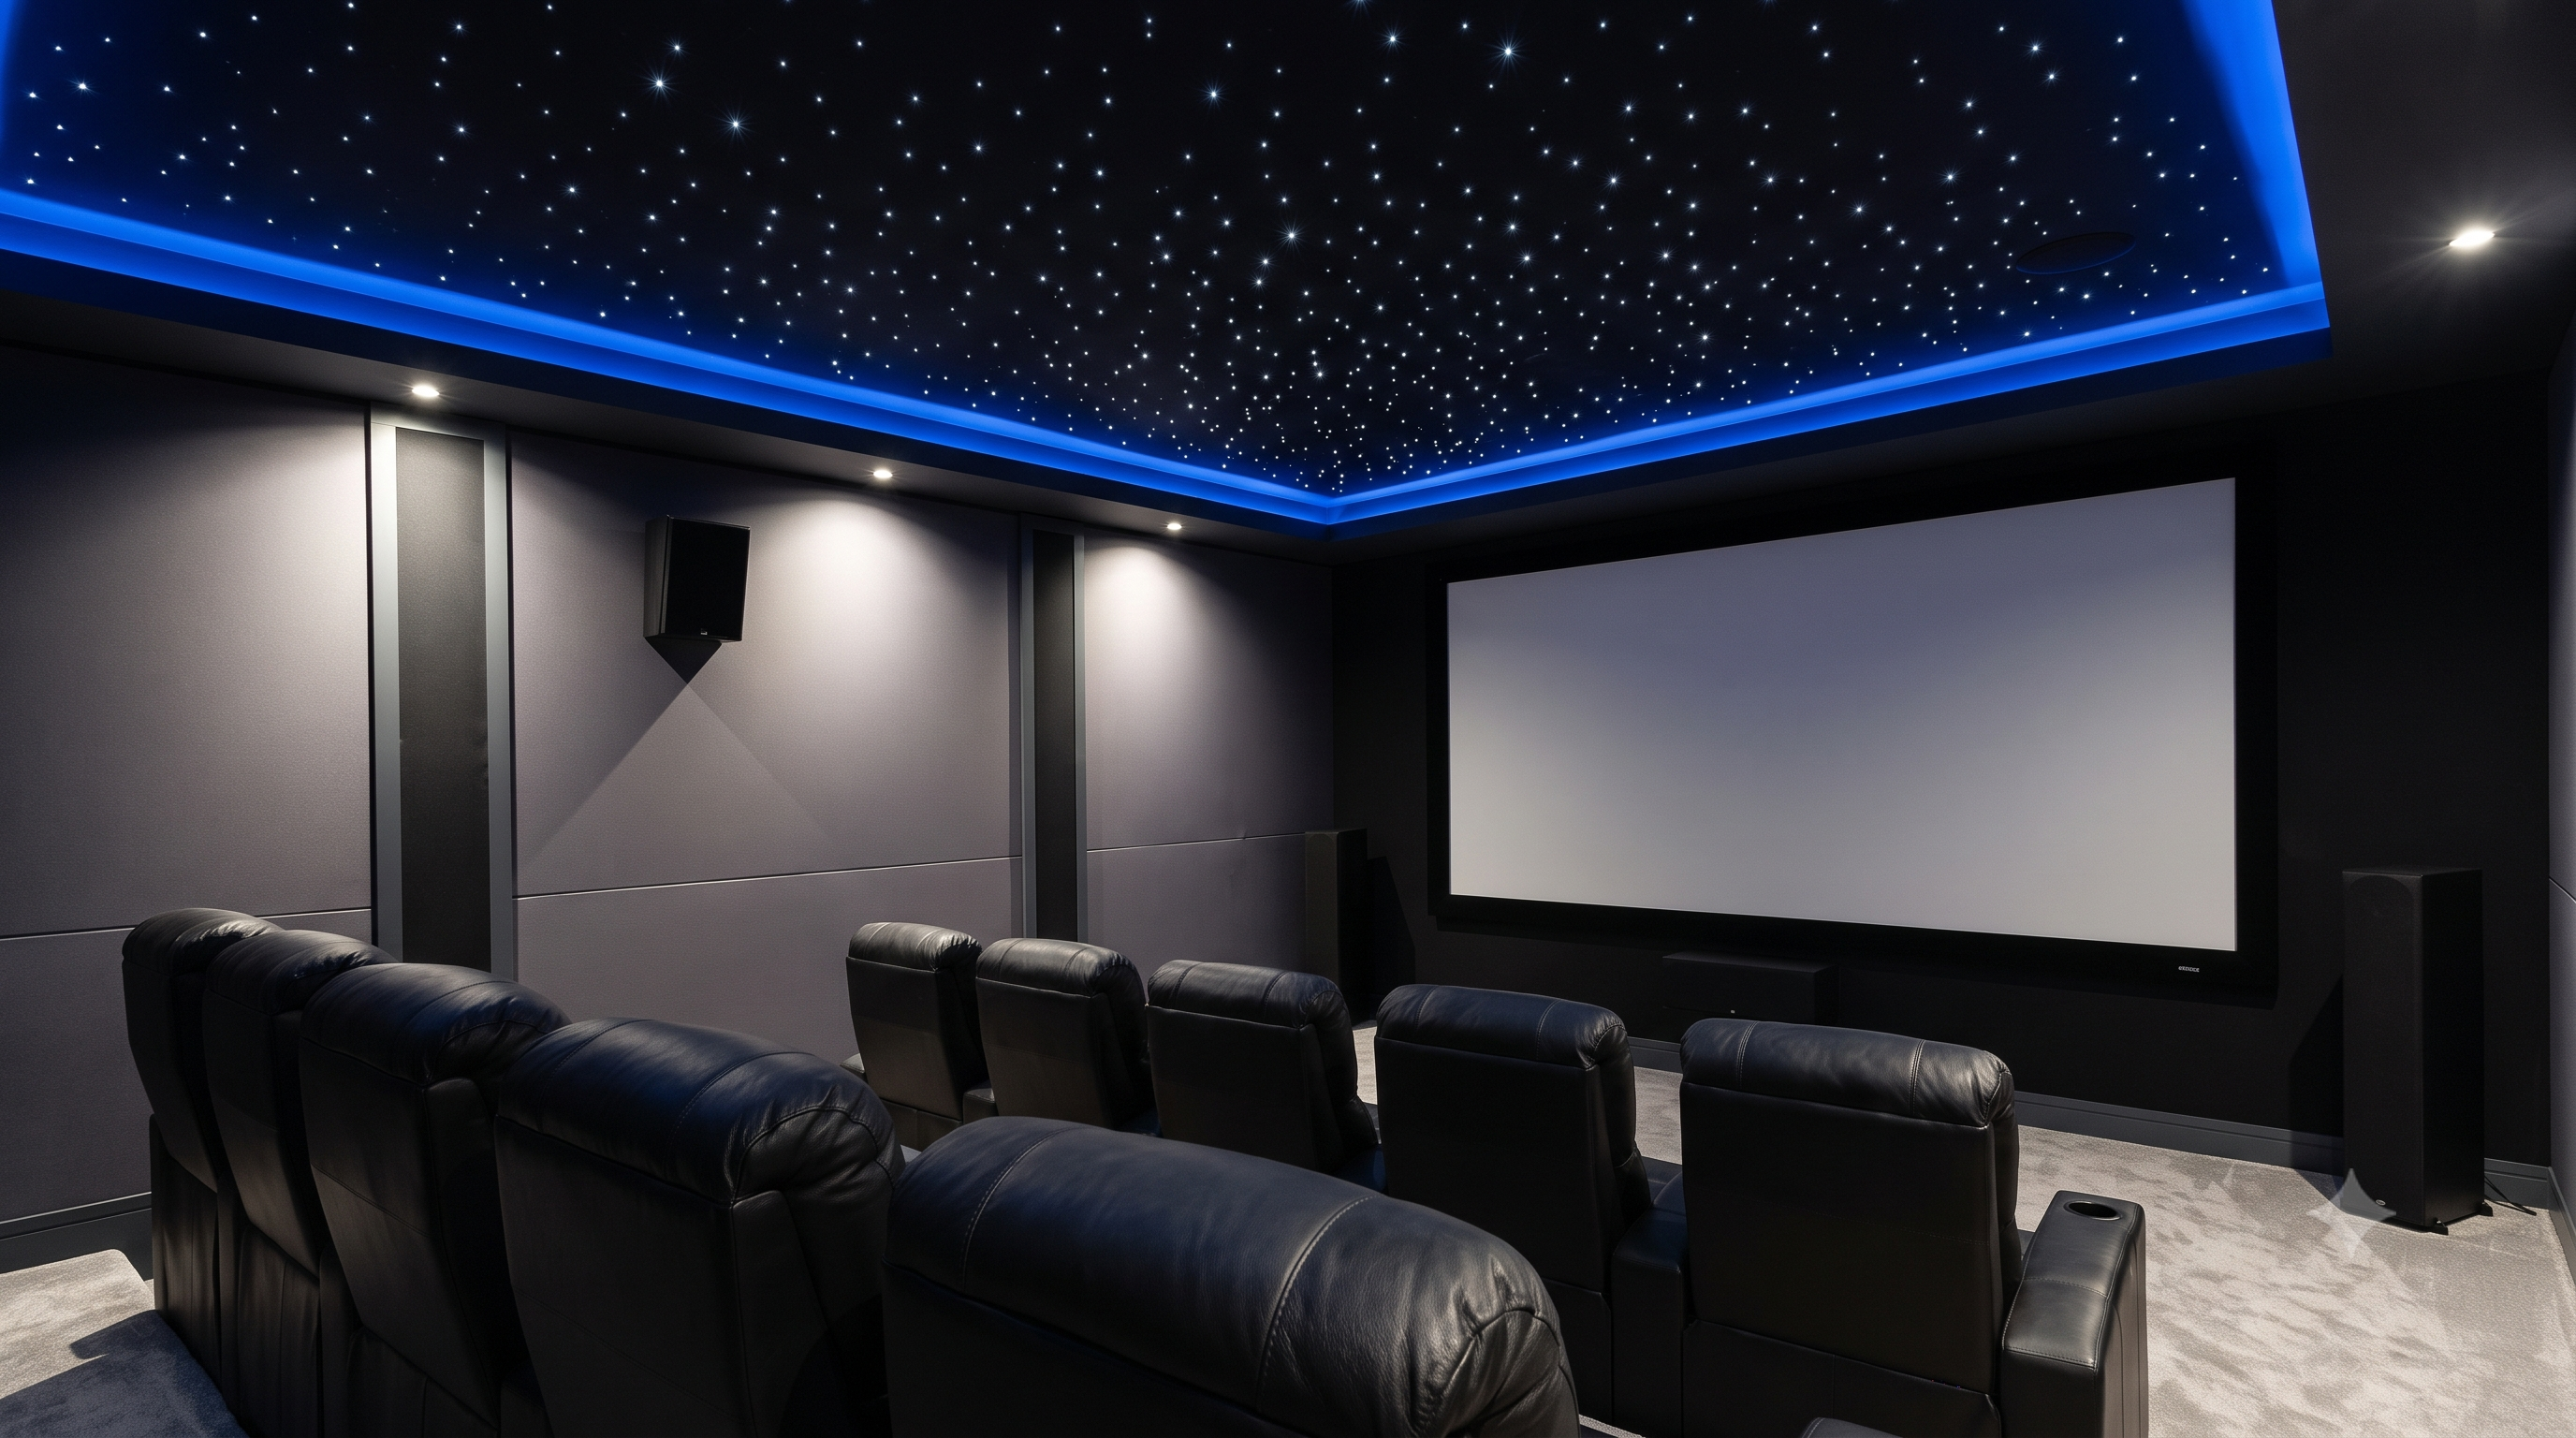
Home Theaters & Media Rooms
This is the most popular application. A starlight ceiling transforms a home theater from a room with a big screen into an immersive cinematic environment. When the lights dim and stars appear overhead, you're no longer in your basement — you're in an outdoor amphitheater under the cosmos.
Professional home theater starlight ceilings often include:
- Shooting stars: Random "meteors" streak across the ceiling
- Dimming control: Sync with your home automation to brighten during intermission, dim during the film
- Acoustic integration: Star panels that double as sound-absorbing treatment
- Horizon effects: LED cove lighting around the perimeter creates a realistic twilight glow
Our teams at Dallas LED Lights combine starlight ceilings with strategic LED accent lighting to create complete theater environments.
Master Bedrooms
Imagine falling asleep under a canopy of softly twinkling stars. A bedroom starlight ceiling creates an atmosphere of calm and romance that no other lighting can match. The gentle glow is bright enough to see by but dim enough to encourage sleep — and because there's no blue light or screen glare, it won't disrupt your circadian rhythm.
Many couples choose custom constellations: the night sky from their wedding date, a meaningful zodiac arrangement, or simply their initials hidden among the stars.
Children's Rooms
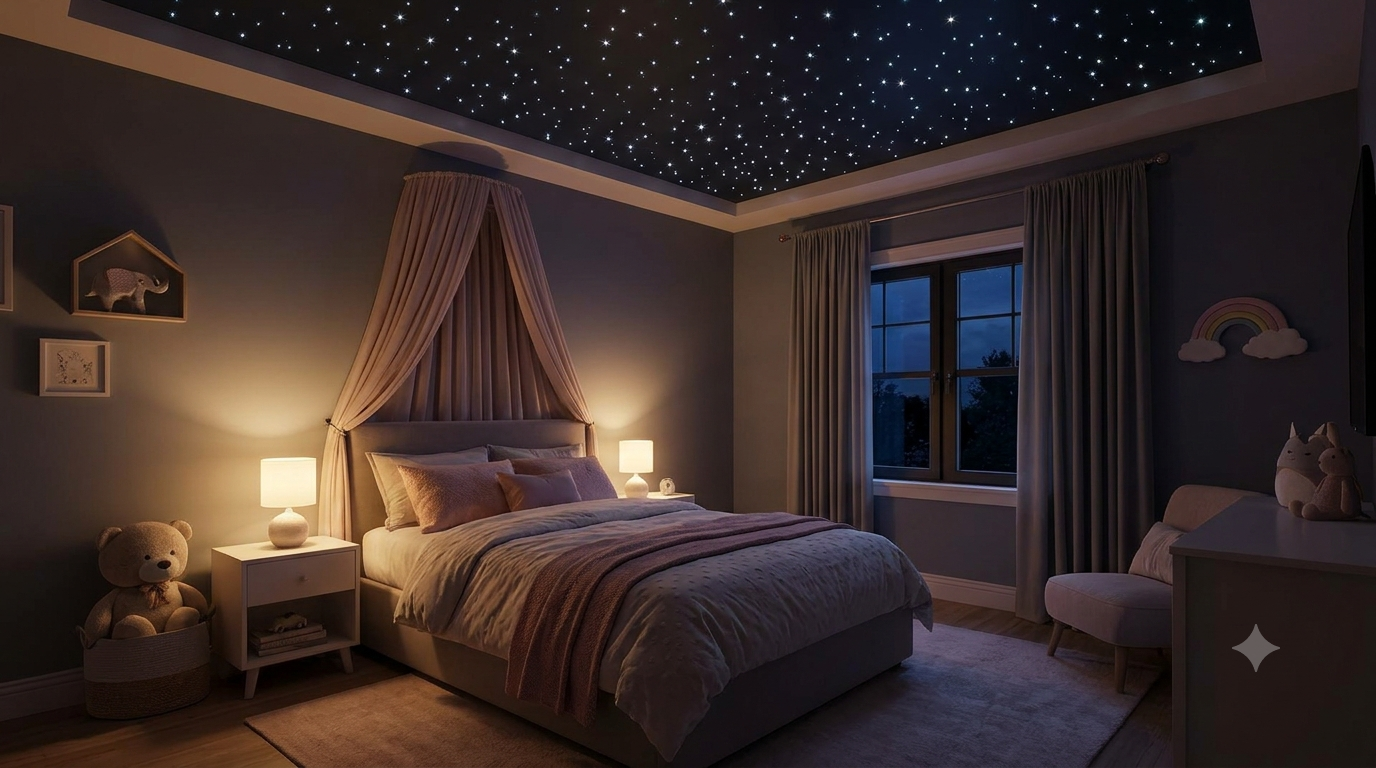
Kids absolutely love starlight ceilings — and parents love them too. For children afraid of the dark, a gentle star ceiling provides enough light for comfort without the harshness of a nightlight. The magical quality sparks imagination and makes bedtime something to look forward to rather than resist.
Because fiber optics are completely safe (no electricity, no heat, no glass), there's zero concern about children's rooms. Even if a child somehow pulled a fiber strand, they couldn't hurt themselves.
Bathrooms, Spas & Saunas
Water and electricity don't mix — but water and fiber optics work perfectly together. Since fiber optic strands carry only light, they're completely safe in high-moisture environments like bathrooms, steam showers, saunas, and indoor spas. This makes them ideal for creating luxurious retreat-like atmospheres in these spaces.
For pool houses and indoor pools, starlight ceilings extend the night-swimming experience to the entire space, not just the water.
Commercial Applications
Starlight ceilings have become increasingly popular in commercial settings:
- Restaurants & Lounges: Create intimate, memorable dining atmospheres
- Hotels & Resorts: Differentiate suites and spa areas
- Casinos: The Las Vegas market loves dramatic ceiling treatments
- Medical & Wellness: Hospices, cancer treatment centers, and therapy rooms use calming star ceilings
- Nightclubs: Dynamic color-changing systems sync with music
Our commercial projects across Texas and Las Vegas demonstrate how starlight ceilings can become signature design elements that customers remember and talk about.
How Do Starlight Ceilings Work?
Understanding the technology helps you make smarter decisions about your installation.
The Components
1. Light Engine (Illuminator)
This is the only electrical component in the system. The light engine sits in a hidden location — above the ceiling, in a closet, in an equipment room — and generates the light that travels through all the fiber strands. Modern light engines use LED technology for energy efficiency and long life (20,000-50,000 hours). Advanced engines include twinkling effects, color-changing capabilities, and shooting star features.
2. Fiber Optic Cables
Thin, flexible plastic or glass strands carry light from the engine to each star point. Professional installations use multiple fiber diameters (typically 0.5mm, 0.75mm, and 1.0mm) to create visual depth — larger fibers appear as brighter, closer stars while smaller fibers look more distant.
3. Ceiling Panel or Surface
The fibers terminate in a ceiling surface. This can be drywall with fibers poked through, acoustic panels with fibers pre-installed, or stretch ceiling material with fibers integrated during manufacturing. The choice depends on your room, budget, and installation complexity.
Installation Approaches
There are three main ways to create a starlight ceiling:
DIY Drywall Installation: Poke hundreds of holes in your ceiling, thread fiber strands through, and connect them to a light engine. This is the most labor-intensive approach but allows complete customization.
Pre-Made Panels: Purchase acoustic panels with fibers already installed. Mount the panels to your ceiling and connect to a light engine. Easier installation but less flexibility in star placement.
Professional Custom Installation: Hire experts who handle everything — star mapping, fiber placement, light engine selection, automation integration, and finishing. The premium option that delivers Rolls-Royce-quality results.
DIY vs. Professional Installation: Making the Right Choice
Let's be direct: we don't recommend DIY for most people. The apparent savings are far smaller than they appear, and the time, skill, and risk involved make professional installation the smarter choice for the vast majority of projects.
Why DIY Starlight Ceilings Rarely Make Sense
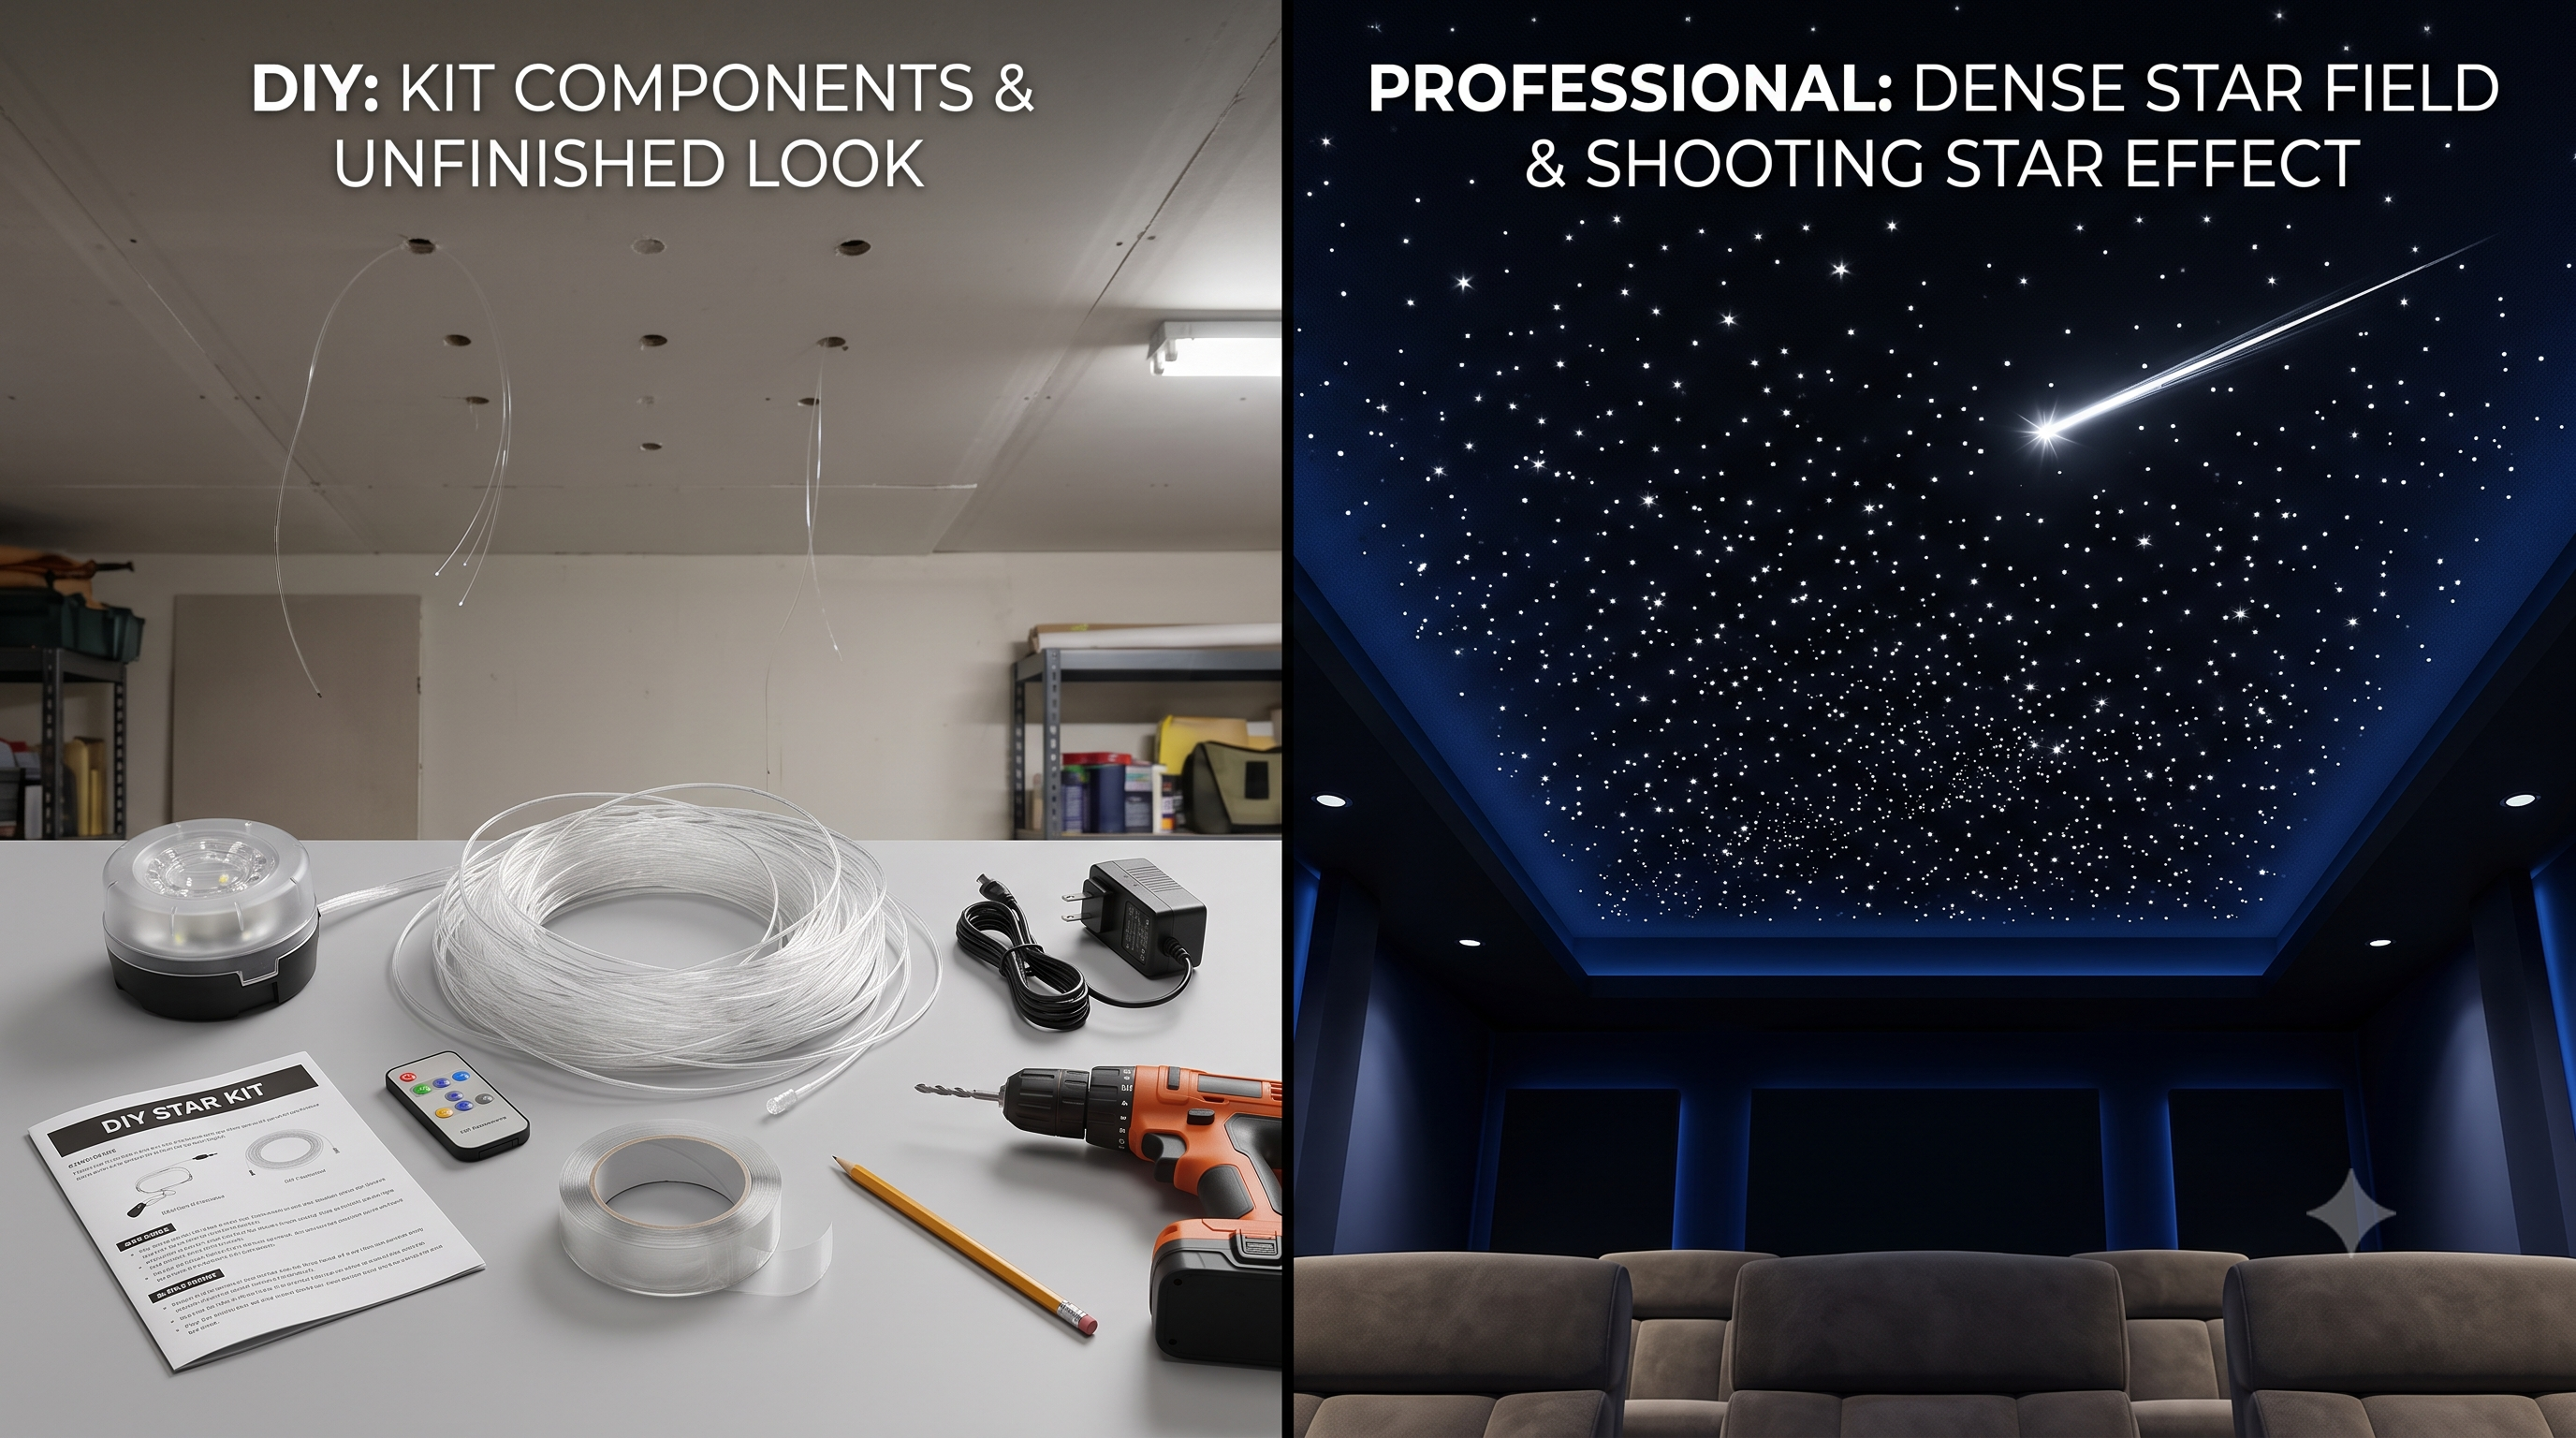
The illuminator alone costs ~$500 — and that's before a single strand of fiber is purchased. You need at least two illuminators for most rooms. Add fiber, panels, fabric, hardware, and likely drywall repairs, and you're looking at $4,000-$5,500+ in materials alone — before counting your time.
Then there's the labor. A realistic DIY timeline for one person:
- Plan star layout & mark ceiling: 3–4 hours (mistakes are permanent)
- Drill hundreds of holes: 1–2 full days (arms overhead the whole time)
- Thread fiber through attic: 2–3 full days (hot, confined space)
- Secure fiber with glue, wait to cure: 1 full day
- Spray paint ceiling + fibers: Half day
- Trim all fibers flush: 3–5 hours
- Drywall patching if needed: 1–2 days
Total: 5–7 full days of work — and even longer in summer when attic temperatures exceed 140°F.
A professional 2-person crew covers 75–90 sq ft per day. Most rooms are finished in 1–2 days. The same job done solo takes a full week — and the finished result is far less consistent.
Professional Installation: The Recommended Approach
Our pre-made panel systems eliminate every DIY headache. At 360 Fiber Lighting and American Starlight Ceilings, our professional installations include:
- Pre-made acoustic panels: Fiber optics and illuminators already built in
- Highest star density: 7–11 stars per square foot (DIY typically achieves half this)
- No attic access required: Panels mount like framed artwork
- Plug-and-play power: Cat5 cables daisy-chain between panels
- Shooting stars, constellations, moon effects: All available
- 5-year materials warranty + lifetime workmanship warranty
- Same-day testing and commissioning
- Ongoing technical support
Most residential rooms install in 1–2 days with zero mess left behind.
When DIY Might Work
DIY can make sense for very small accent areas (under 50 sq ft), experienced builders who value the process over efficiency, or situations where professional installation isn't available. If you're determined to go DIY, Wiedamark offers kits and technical support — but go in with realistic expectations about time and total cost.
Starlight Ceiling Cost: What to Expect
Star ceiling pricing has two separate components: the product and the installation. These are always quoted and invoiced separately, so you know exactly what you're paying for.
PRODUCT
$55
per sq ft
Pre-made panels
INSTALLATION
$20-24
per sq ft
2-person crew
TOTAL INSTALLED
$75-79
per sq ft
Complete turnkey
Project Cost by Room Size
| Application | Size | Product @ $55/sf | Install @ $20-24/sf | Total Installed |
|---|---|---|---|---|
| Small bedroom | 100 sq ft | $5,500 | $2,000–$2,400 | $7,500–$7,900 |
| Master bedroom | 150 sq ft | $8,250 | $3,000–$3,600 | $11,250–$11,850 |
| Home theater | 200 sq ft | $11,000 | $4,000–$4,800 | $15,000–$15,800 |
| Large bedroom / loft | 250 sq ft | $13,750 | $5,000–$6,000 | $18,750–$19,750 |
| Living room | 300 sq ft | $16,500 | $6,000–$7,200 | $22,500–$23,700 |
| Great room | 400 sq ft | $22,000 | $8,000–$9,600 | $30,000–$31,600 |
| Commercial — small | 600 sq ft | $33,000 | $12,000–$14,400 | $45,000–$47,400 |
| Commercial — large | 1000 sq ft | $55,000 | $20,000–$24,000 | $75,000–$79,000 |
High ceilings, complex layouts, custom constellation patterns, or RGB color-changing systems may affect installation rate. All figures are estimates — contact us for a project-specific quote.
What's Included in Pre-Made Panels ($55/sq ft)
Our recommended approach uses custom-manufactured acoustic ceiling tiles with fiber optics and illuminators already built in. Power connects via Cat5 cables that daisy-chain between panels. No attic access. No drilling. No mess. They mount like framed artwork — most rooms are done in a day.
- Highest star density — 7 to 11 stars per sq ft
- Acoustic treatment built in (NRC >1.0 options)
- LED light engine included — no separate wiring
- Any size, shape or color — fully custom
- Shooting stars, constellations, moon effects available
- Plug-and-play Cat5 daisy-chain power
- 5-year materials warranty
What's Included in Professional Installation ($20-24/sq ft)
Our certified installation team handles everything on-site. A standard 2-person crew covers 75–90 sq ft per 8-hour day at $225/hr. Most residential rooms install in 1–2 days.
- Certified installation team
- All tools and equipment provided
- Clean install — no mess left behind
- Same-day testing and commissioning
- Lifetime workmanship warranty
- Custom constellation mapping available
- Ongoing technical support post-install
Why We Don't Recommend DIY
Before you consider DIY — read this carefully. Most people who attempt DIY fiber optic installation significantly underestimate the cost, time, and difficulty involved. The savings are far smaller than they appear.
Here's the reality of going DIY:
| Component | Detail | Approximate Cost |
|---|---|---|
| Illuminator — need at least 2 | WDM-502, required to power fiber | ~$500 each = $1,000+ |
| Starpack48 fiber — bulk spool | 328 ft spool, one per illuminator | ~$1,073 each = $2,146+ |
| Acoustic panels or ceiling substrate | Owens Corning 703, 12-pack | ~$400 |
| Acoustic fabric | Black, ~20 yards | ~$120 |
| Hardware, adhesive, paint | Anchors, 3M 77, flat black spray | ~$300 |
| Drywall patching — likely needed | Craters from each drill hole | $200–$600+ |
| Your time — one person | Realistic: 5–7 full days minimum | Not billable, but very real |
| True material cost (before your time) | $4,000–$5,500+ | |
Additional DIY challenges:
- Attic access required — not possible in many homes
- Dangerous in summer — attic temps exceed 140°F
- 5–7 full days solo vs. 1–2 days with a pro crew
- Half the star density of pre-made panels
- Final quality depends entirely on your skill level
A professional 2-person team covers 75–90 sq ft per day. Most rooms are finished in 1–2 days. The same job done solo takes a full week — and the finished result is far less consistent.
For DIY kits and components, visit Wiedamark — but understand what you're getting into before you start.
Star Density: How Many Stars Do You Need?
One of the most common questions we get is "how many stars should I have?" The answer depends on the effect you want:
- Sparse (2-3 stars per square foot): Subtle, elegant, like a clear night in the mountains. Good for bedrooms where you don't want overwhelming brightness.
- Medium (4-6 stars per square foot): The most popular choice. Enough stars to feel immersive without being overwhelming. Ideal for home theaters.
- Dense (7-10+ stars per square foot): Dramatic, Milky Way-like effect. Best for smaller accent areas or clients who want maximum impact.
For reference, a typical 150 square foot home theater ceiling at medium density would have 600-900 stars. The Rolls-Royce Starlight Headliner (roughly 12 square feet) contains up to 1,600 stars — that's an extraordinary 130+ stars per square foot, creating an intensely luxurious effect.
Advanced Features: Beyond Basic Twinkling
Modern starlight ceiling systems offer effects that weren't possible even a few years ago:
Shooting Stars (Meteors)
Special fiber runs create streaking lights that appear to shoot across your ceiling at random intervals. The effect is startlingly realistic — guests will do double-takes thinking they saw an actual shooting star. Professional systems allow you to control frequency (once every few minutes to once every 30 seconds) and direction.
Color-Changing Stars
RGBW (Red, Green, Blue, White) light engines let you change your entire star field to any color — or cycle through colors slowly for a dynamic effect. Imagine your home theater stars shifting from white to deep blue as a movie begins, or your bedroom stars warming to soft amber as you wind down for sleep.
Custom Constellations
Want the exact night sky from your wedding date? Your child's zodiac constellation? A secret message spelled out in stars? Professional installers can map any pattern you desire. Some clients request the night sky from significant locations — the stars above the hospital where their child was born, the sky over their honeymoon destination.
Music Sync
For nightclubs and entertainment spaces, starlight systems can pulse and change with music. This creates an incredibly immersive party atmosphere. Some home theater enthusiasts also use this feature for concerts and music videos.
360° Laser Fiber Optic Integration
Our 360° laser fiber optic technology — the same system winning awards at LDI and lighting Genesis luxury vehicles — can be combined with traditional starlight ceilings. While traditional fibers create point-source stars, 360° cables create continuous glowing lines. Use them together for constellation outlines, horizon effects, or dramatic accent elements.
Installation Process: What to Expect
Whether you choose DIY or professional installation, here's what the process typically involves:
Phase 1: Planning & Design
Before any installation begins, you need a plan:
- Measure ceiling dimensions precisely
- Decide on star density and any constellation patterns
- Identify light engine location (needs power and ceiling access)
- Choose panel type or drywall approach
- Select effects (shooting stars, color-changing, etc.)
Professional installers handle all of this during a design consultation. DIY installers should spend significant time planning before purchasing materials.
Phase 2: Preparation
Depending on your approach:
- Drywall method: Mark star positions, drill or poke holes, prepare fiber routing
- Panel method: Install mounting hardware, prepare electrical for light engine
- New construction: Coordinate with builder to run fiber conduit before drywall
Phase 3: Fiber Installation
This is the labor-intensive part. Each fiber strand must be:
- Threaded through its hole or panel
- Secured with adhesive (typically silicone or hot glue)
- Trimmed to proper length (slightly protruding from ceiling surface)
- Bundled and routed to the light engine
For a 500-star ceiling, this can take 15-30 hours depending on method and experience.
Phase 4: Light Engine Setup & Testing
Once all fibers are placed:
- Bundle fibers into the light engine's aperture
- Secure connections
- Test all stars for proper illumination
- Adjust any that aren't lighting correctly
- Program effects and controls
Phase 5: Finishing
Final steps include:
- Touch up any ceiling damage
- Paint if necessary (fiber tips can be painted over — they'll still glow)
- Clean up debris and fiber trimmings
- Program automation integration
- Client training on controls
Professional installation for a typical home theater takes 1-2 days with our pre-made panel systems. DIY projects often span 5-7 full days or more.
Starlight Ceiling Maintenance
One of the best things about fiber optic starlight ceilings is their minimal maintenance:
- Fiber strands: Virtually maintenance-free. They don't burn out, don't degrade, and can last 30+ years.
- Light engine: LED engines last 20,000-50,000 hours. At 4 hours daily use, that's 13-34 years. When an engine eventually needs replacement, it's a simple swap — no ceiling work required.
- Cleaning: If dust accumulates on fiber tips over many years, a soft brush can clean them. This is rarely necessary.
Compare this to LED alternatives that require bulb replacements, or traditional lighting with multiple failure points. Once installed, a starlight ceiling essentially maintains itself.
Common Questions About Starlight Ceilings
Before we dive into FAQs, let's address some concerns we hear regularly:
"Will it look cheap?" — Quality depends entirely on installation. DIY projects with uneven star distribution, visible fiber strands, or inadequate light engines can look amateur. Professional installations with proper star mapping, multiple fiber diameters, and high-quality components look stunning. You get what you pay for.
"Can I do this in a rental?" — Panel-based systems can potentially be removed when you move, though this isn't their intended purpose. For renters, we generally recommend portable star projectors instead of permanent fiber optic installations.
"Will it hurt my home's resale value?" — In the right room (home theater, master suite), a quality starlight ceiling is a selling feature that helps your home stand out. Real estate agents report that dramatic home theaters with star ceilings create memorable impressions that help close sales.
Why Choose 360 Fiber Lighting for Your Starlight Ceiling
With dual locations serving Dallas-Fort Worth and Las Vegas, we bring unique advantages to starlight ceiling projects:
- Award-winning technology: Our 360° laser fiber optic systems won the LDI 2024 Best New Product Award. We're not just installers — we're innovators.
- Full-service capability: From DIY kit supply through Wiedamark to complete custom installation via American Starlight Ceilings, we offer every level of service.
- Complete lighting integration: Our teams at Arlington, Irving, and Plano LED Lights can combine starlight ceilings with comprehensive LED lighting designs.
- Commercial expertise: We've installed dramatic lighting in Las Vegas venues and Dallas commercial spaces, bringing that expertise to residential projects.
- Modular construction integration: Working with America Modular Buildings and Dallas Modular Structures, we can even build dedicated home theater structures with integrated starlight ceilings.
Get Started: Your Starlight Ceiling Consultation
Ready to bring the Rolls-Royce experience home? Here's how to begin:
Step 1: Free Consultation
Contact our team to discuss your space, vision, and budget. We'll help you understand your options — from DIY kits to full custom installation.
Step 2: Design & Quote
For professional installations, we'll create a detailed design showing star density, constellation options, and effects. You'll receive a clear quote with no hidden costs.
Step 3: Installation
Our professional team handles everything, working around your schedule to minimize disruption. Most residential projects complete in 1-2 days with no mess left behind.
Step 4: Enjoy
Dim the lights, look up, and experience the magic. Every night becomes extraordinary.
Transform Your Space with a Starlight Ceiling
Get the Rolls-Royce experience in your home theater, bedroom, or commercial space.
📞 Call (702) 738-2218
Frequently Asked Questions
How much does a starlight ceiling cost?
Professional turnkey installations run $75-79 per square foot, which includes both product ($55/sq ft for pre-made panels) and installation ($20-24/sq ft). A small bedroom (100 sq ft) runs $7,500-$7,900. A home theater (200 sq ft) runs $15,000-$15,800. Commercial spaces range from $45,000 to $79,000+ depending on size. Product and installation are always quoted separately so you know exactly what you're paying for.
How long does installation take?
Professional installation with pre-made panels typically completes in 1-2 days for most residential rooms. A 2-person crew covers 75-90 sq ft per 8-hour day. DIY installations take significantly longer — expect 5-7 full days of work for one person, plus the risk of attic heat exposure in summer months.
Are starlight ceilings safe?
Extremely safe. Fiber optic strands carry only light — no electricity and no heat. You can safely install them in children's rooms, bathrooms, saunas, and pool areas. There's no fire risk and no electrical hazard.
Can I install a starlight ceiling in a bathroom or pool area?
Yes! Because fiber optics carry light instead of electricity, they're completely safe in wet and humid environments. This makes them ideal for bathrooms, steam showers, saunas, indoor pools, and spa areas where traditional electrical lighting would be hazardous.
How long do starlight ceilings last?
The fiber optic strands themselves can last 30+ years with no maintenance. The LED light engine typically provides 20,000-50,000 hours of operation. At 4 hours of daily use, that's 13-34 years. When the engine eventually needs replacement, it's a simple swap with no ceiling work required.
What's the difference between DIY and professional installation?
DIY requires 5-7 full days of labor, $4,000-$5,500+ in materials, attic access, and results in roughly half the star density of professional panels. Professional pre-made panel installations complete in 1-2 days, include 7-11 stars per square foot, require no attic access, and come with a 5-year materials warranty plus lifetime workmanship warranty. For most people, the gap between DIY cost and professional cost is far smaller than expected once you account for true material costs and time investment.
Can I customize the star pattern?
Yes. Professional installers can create custom constellations including the night sky from a specific date (wedding, birth), zodiac arrangements, initials, or any pattern you desire. DIY installations can also be customized, though it requires more planning.
Do starlight ceilings add value to my home?
In appropriate spaces (home theaters, master suites), a quality starlight ceiling is a memorable feature that helps your home stand out. Real estate professionals report that dramatic home theaters with star ceilings make strong impressions on buyers.
Can starlight ceilings be combined with other lighting?
Absolutely. The best home theater designs combine starlight ceilings with LED cove lighting (for horizon effects), accent lighting, and smart controls that coordinate everything. We specialize in integrated lighting designs that use multiple technologies together.
What if I want to remove or change the ceiling later?
Panel-based systems can potentially be modified or removed. Drywall-integrated fiber installations are essentially permanent — the ceiling would need to be replaced to remove them. However, since the fibers are invisible when the light engine is off, most people never feel a need to remove them.